Tuesday, July 7, 2015

Linux Full Disk Encryption


Linux Full Disk Encryption On Ubuntu 14.04 LTS

The full disk encryption typically used in Linux is DM-Crypt with LUKS. DM-Crypt is essentially cryptographic system for block devices that uses device mapper. More information on DM-Crypt can be found here. LUKS is the Linux Unified Key Setup and is a specification for key management. More can be found here.

The setup that will be described in this post will use DM-Crypt and LUKS via the cryptsetup utility. Also Ecryptfs and LVM will be used.

First the disk layout should be defined. For this setup there will be a single removable disk and a standard hard drive. The removable disk can be a USB drive or some other writable storage device that can be used to boot from.

The following represents the encryption layout that will be used.


Boot Ubuntu live disc in Try Mode.
Start two terminals.
In one terminal identify the disk for encryption and the disk for /boot
Prepare the encrypted disk by filling it with pseudo-random data.

sudo dd if=/dev/urandom of=/dev/sda bs=512;

Once complete, create the encrypted disk.

sudo cryptsetup -c aes-xts-plain64 --hash sha512 --key-size 512 luksFormat /dev/sda;

Open the encrypted disk.

sudo cryptsetup open –type luks /dev/sda lvm;


Create the LVM volumes.

sudo pvcreate /dev/mapper/lvm;
sudo vgcreate system /dev/mapper/lvm;
sudo lvcreate -L 10G -n rootvol system;
sudo lvcreate -L 2048M -n swapvol system;
sudo lvcreate -l 100%FREE -n homevol system;


Create partition table for boot disk.

sudo fdisk /dev/sdb;
n, p, 1, <enter>, <enter>, w


Make the file systems.

sudo mkfs.ext4 /dev/mapper/system-rootvol;
sudo mkfs.ext4 /dev/mapper/system-homevol;
sudo mkfs.ext2 /dev/sdb1;
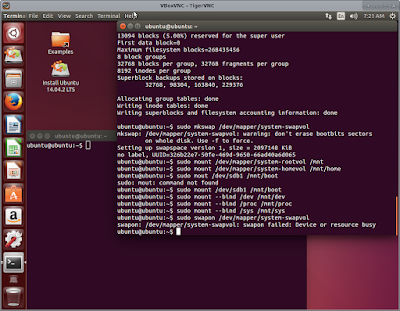
sudo mkswap /dev/mapper/system-swapvol;


Run the installer and use the “something else” disk option.
Set the boot disk as “/dev/sdb” and assign the mountpoints to the corresponding partitions and volumes.
At the user creation section. Do not select encrypt home directory.
Once the install is finished; Continue “testing”.


At this point we will configure the new OS to use the encrypted disk and encrypt the user's home directory.

Mount volumes, partitions, and other FS for chroot.

sudo mount /dev/mapper/system-rootvol /mnt;
sudo mount /dev/mapper/system-homevol /mnt/home;
sudo mount /dev/sdb1 /mnt/boot;
sudo mount –bind /dev /mnt/dev;
sudo mount –bind /proc /mnt/proc;
sudo mount –bind /sys /mnt/sys;
sudo swapon /dev/mapper/system-swapvol;
blkid;


In the second terminal we will chroot into the newly installed OS and configure it to boot using the encrypted disk.

sudo chroot /mnt;
ecryptfs-migrate-home -u user;
vi /etc/crypttab;
     “lvm UUID=<ID from blkid of the encrypted disk, crypto_LUKS> none luks,discard”
     save and exit
vi /etc/initiramfs-tools/conf.d/resume;
     “RESUME=/dev/mapper/system-swapvol”
     save and exit
update-initramfs -u -k all -c -v;
exit;


Unmount the /mnt mount points from terminal one and remove swap.

sudo umount /mnt/home /mnt/boot /mnt/dev /mnt/proc /mnt/sys /mnt;
sudo swapoff /dev/mapper/system-swapvol;


Reboot into the newly installed Ubuntu OS.


Monday, June 29, 2015

Tunneling out of Restrictive Networks

The scenario, a person tries to access a website of an independent news publication but is blocked by internet censoring appliances. How can this person access this site? One way is to use a proxy found on the internet. Another is to use the tor browser to tor itself. What this post is demostrating is how to setup a SSH Socks proxy wrapped by an SSL/TLS tunnel.

Just to be clear, I am not against the use of tor.

For this setup we will need a Linux server outside of the restrictive network that is under the user's control. On that server we will need to install stunnel,OpenSSH, and OpenSSL. The server will be an Ubuntu system. We will be using a Linux client for simplicity, but this concept should work on Mac and Windows based clients.

Server:

First, we'll install stunnel and openssh.
sudo apt-get update && apt-get install stunnel openssh-server openssh-client;

Next, we will configure the stunnel server as root or by using sudo.
vi /etc/stunnel/stunnel.conf;

Add the following lines to stunnel.conf.
cert=/etc/stunnel/stunnel/pem
pid=/var/run/stunnel.pid
[ssh]
accept=443
connect=127.0.0.1:22

This will configure stunnel to use /etc/stunnel/stunnel.pem as the SSL certificate. And use /var/run/stunnel.pid as the lock file. This configuration also defines the accepted inbound IP and port as well as the IP and port of the service to access. The inbound access is set to any IP on port 443. The reason for port 443 is that most networks allow general web access which means outbound traffic to port 80 and 443 are usually allowed. Port 443 is commonly used for SSL/TLS traffic on the Internet. So we will use this port as well so not raise any flags when traffic analysis is conducted. The service that stunnel will connect to is at IP 127.0.0.1 on port 22. This is the local (server's) SSH service running on the common ssh port, 22.

The next thing we will need to do is create a SSL/TLS certificate for stunnel. For this setup we will creating a self signed certificate. But using a certificate from a certificate authority is a possibility.
openssl genrsa -out key.pem 2048;
openssl req -new -x509 -key key.pem -out cert.pem -days 730;
cat key.pem cert.pem > /etc/stunnel/stunnel.pem;

Finally we will need to enable the stunnel service.
For Ubuntu we will need to edit /etc/default/stunnel4 as root or by using sudo.
vi /etc/default/stunnel4;

Change “ENABLED=0” to “ENABLED=1”.
Once the configurations are complete, start the service.
Executing “sudo netstat -lnp” will list the listening ports and their process ids and names.

Active Internet connections (only servers)
Proto     Recv-Q     Send-Q     Local Address     Foreign Address     State     PID/Program name
tcp         0               0              0.0.0.0:443           0.0.0.0:*                 LISTEN     4845/stunnel4


Client:

For the client we will install stunnel and openssh.
sudo apt-get update && apt-get install stunnel openssh-server openssh-client;

Like the server we will need to configure stunnel. Only for the client we only need to create the /etc/stunnel/stunnel.conf file.

As root or by using sudo, create /etc/stunnel/stunnel.conf.
vi /etc/stunnel/stunnel.conf;

Add the following to stunnel.conf.
pid=/var/run/stunnel.pid
client=yes
[ssh]
accept=443
connect=<Server's IP>:443

Where <Server's IP>, place the IP of the stunnel server. This configuration will connect to the server on port 443 and will use the local port 443 for tunneling.

Just like the server we need to enable the stunnel service.
As root or by using sudo edit /etc/default/stunnel4 and change “ENABLED=0” to “ENABLED=1”.
Now we can start the service and have the client connect create a SSL tunnel to our server.

Once the stunnel client service is started. We can create our Socks proxy with openssh.
To do this we will use a ssh command similar to this one.

ssh -p 443 -D 1234 <user>@127.0.0.1;

The user will be a user that is on the stunnel server. Port 443 is the port that ssh is listening on. Port 1234 is the port that will be used for the socks proxy. For added security, it is recommended to use key based authentication for ssh logins. That can be done by using the utility “ssh-keygen”.

Now we have a Socks proxy inside of a SSH tunnel inside of a SSL/TLS tunnel.

There are a couple ways to detect this setup from a network perspective.
First is SSL man in the middle. If the network has essentially a SSL man in the middle setup where the certificate is replaced with one where the traffic can be decrypted by the network owner. The traffic inside of the stunnel SSL tunnel would be decipherable. But since the traffic is also inside of a SSH tunnel we should be fine. The only issue is that the traffic is can now be identified as SSH traffic and will most likely be flagged.

 The second way to detect our setup would be through network traffic analysis. The traffic generated by this setup is not typical off SSL web traffic. The SSL connection will usually short lived. Our setup creates a SSL connection that would last as long as we are using the SSH Socks proxy.

Wednesday, January 2, 2013

Iptables, Logging, and Firewalls in general.

Firewalls are great. Firewalls can now be found on almost any modern operating system. Firewalls are only one step to a secure computer.
A prefect firewall would only allow the good stuff through and stop the bad stuff. The problem is how do you define the good stuff. Is one port or packet better/safer than another? Is this good looking packet carrying some dangerous data? This is why a firewall can stop everything. It can only stop some bad things. So remember firewalls are only one tool in the IT security toolbox.

Iptables:
Iptables is found on Linux and functions as its standard firewall. Iptables uses a ruleset to define what is allowed and what is denied. Don't assume that since you have iptables installed that it will deny incoming packets by default. Some Linux distributions have iptables set to allow incoming traffic as default. Now down to some iptable rules.

The iptables ruleset starts out by defining what iptables is going to do. The ruleset can have both a NAT section and filter section. Usually you will only see the filter section. 

*filter
:INPUT DROP [0:0]
:FORWARD DROP [0:0]
:OUTPUT ACCEPT [0:0]

This part of the filter section defines the default policies for incoming, outgoing, and forwarded packets. In this example all incoming and forwarded packets are dropped by default. This is what you want because you wouldn't want the firewall to allow just any packet on any port from any IP. Having all outgoing packets allowed is fine unless you really what to lock down the system then dropping by default is probably what you will want. Just make sure you create rule to allow outgoing traffic. 

-A INPUT -i lo -j ACCEPT
-A INPUT -m state --state NEW -m tcp -p tcp --dport 22 -j ACCEPT

These two rules allows incoming traffic from the loopback and traffic to port 22. The -i defines the incoming interface. The -p and --dport define the protocol and the destination port.

Now the way iptables works is that it goes down the ruleset until it find a match. If it never finds a matching rule then is should use the default but its better safe than sorry. So what we do is add a drop rule at the end of the ruleset. It is also a good idea to log the dropped packets so that you know what is trying to access the system and on what ports. To do this we add a log rule just before the drop rule.

-A INPUT -j LOG --log-prefix "iptables: " --log-level 4
-A INPUT -j DROP

The first line the the log rule. Each packet that doesn't meet the the previous rules is logged and as a prefix of iptables: so it will be easier to identify and if using rsyslog easier to create a log file just for iptables. The log level is the kernel logging level. In this case 4 is kern.warn.

That is a real basic iptables ruleset. I did leave out a few common things like established states. Most of the time there is a simple ruleset on the Linux system already with the most common rules defined for you.

Logging:
Now that we have iptables configured and set to log dropped packets we need to configure the logging system to handle the data from iptables. If your using syslog then setting up the iptables log is fairly simple. Add kern.warn logfile destination to syslog.conf. The issue I have with using syslog for iptables is that iptables will also be logged into the messages log. I'm sure there is a way to configure syslog so that  iptables is only logged to the iptables log but I haven't found one and rsyslog is becoming very common. 

For rsyslog I suggest creating an iptables.conf file in rsyslog.d. This just makes it easier to configure rsyslog later on when adding other log configurations. In iptables.conf add :msg, startswith, "iptables: " -/var/log/iptables.log. If you are using a RHEL 5 based system there are some configurations that needs to be made to /etc/sysconfig/rsyslog and /etc/rsyslog.conf before rsyslog will be able to properly log iptables with the iptable log config. In sysconfig/rsyslog change -m 0 to -c 3 and in /etc/rsyslog.conf add $IncludeConfig /etc/rsyslog.d/*.conf.

Some systems have log rotation configured and its usually on every boot. When you have a system that is up for long periods of time, say months, an on boot log rotation can get messy. To control the log rotation I use logrotate to manage when to rotate the logs. Here is a config file I used for the iptables log. 

/var/log/iptables.log
{
        rotate 7
        daily
        missingok
        notifempty
        dateext
        delaycompress
        compress
        postrotate
                 invoke-rc.d rsyslog reload > /dev/null
        endscript
}

The log is rotated daily for 7 rotations and the older logs are compressed. 

In my example setup iptables will drop all incoming packets except those that are from the loopback or going to port 22. It will also log all the dropped packets in /var/log/iptables.log. The log file iptables.log is rotated everyday and only 7 rotations are kept. 

Thursday, June 28, 2012

Useful utilities for the secure VM

Now that we have a VM that sits on an encrypted data store. We can install utilities that can make the our guest OS more secure.
Since I opted for XUbuntu as my guest OS I'll be using apt-get and ubuntu's package management system.

Ok first I think we need a secure way of deleting data. Since deleting data doesn't actually overwrite the data. We'll need something that does that. Two programs I use are wipe and scrub.

Now we need a way to browse the Internet. I prefer firefox but chrome/chromium is also a good choice. If you want to take to the next level I suggest using tor. Either install tor and a proxy server on the OS or get the tor bundle. The bundle include firefox with some addons that promote safe browsing.


Deletion
wipe
scrub

Internet Browsing
chrome/chromium
firefox
tor bundle

Email/Messaging
Thunderbird
pidgin
torchat
enigmail

aide
snort
apg
ntop
darkstat
nmap
openvpn
strongswan
ufw
firestarter
denyhost
fail2ban

disable root ssh login


Thursday, June 14, 2012

Secure Virutal Machine. Creating

Creating a secure VM using Linux, Encfs, and Virtutal Box.

First install and setup Encfs.
To create an Encfs directory run.

encfs /path/to/encrypted-directory /path/to/mount-directory
encfs ~/.encOS ~/encOS;

This command also mount the directory.

Now time to choose the OS. For this example I chose XUbuntu.

Install Virtual Box and create your VM using the Encfs directory.

Create the VM image in the Encfs directory. I feel an image is more portable than any of the other disk options in Virtual Box.

For an added level of complexity you might want to encrypt the system or your home directory in the VM.
Also use a complex password. I suggest a password with at least 14 characters including letters, numbers, and special characters.
GRC has a password calculator if you to see how complex your password is.

Once you have finished installing your OS. You are done with the first part of creating a secure VM. Now all data on the VM is encrypted and if you enabled home directory encryption your personal files in your home directory are double encrypted.

Later we'll add utilities to add more security to the VM.

Thursday, June 7, 2012

Nagios server and client on CentOS 6

Install Centos 6 and configure as needed

Nagios Server install

  • Install epel
Get the epel release rpm installed it can be found here.
rpm -ivh http://dl.fedoraproject.org/pub/epel/6/x86_64/epel-release-6-7.noarch.rpm

  • Disable selinux
Edit /etc/sysconfig/selinux. Change enforcing to disabled. The reboot


  • Install Nagios packages
Install nagios, nagios-plugins-all, nagios-plugins-nrpe, php-pear, mod_ssl, net-snmp-utils, sendmail

yum install nagios nagios-plugins-all nagios-plugins-nrpe php-pear mod_ssl net-snmp-utils sendmail


  • Create nagios user and password or web interface
htpasswd /etc/nagios/passwd nagiosadmin


  • Iptables
Allow port 443 in iptables


  • Add apache to nagios group
usermod -a -G nagios apache


  • configure services
chkconfig nagios on
chkconfig httpd on
chkconfig sendmail on
service sendmail restart


  • Edit httpd.conf and enable SSL in nagios.conf
Make changes to /etc/httpd/conf/httpd.conf if needed.
uncomment SSLRequireSSL in /etc/httpd/conf.d/nagios.conf
restart httpd


  • Configure for nrpe
Uncomment cfg_dir=/etc/nagios/servers in /etc/nagios/nagios.cfg
Add check nrpe command.
Add the following to /etc/nagios/objects/commands.cfg.

define command{
command_name check_nrpe
command_line /usr/lib64/nagios/plugins/check_nrpe -H $HOSTADDRESS$ -c $ARG1$
}

make the servers directory
mkdir /etc/nagios/servers
chown root:nagios /etc/nagios/servers
service nagios restart

(a reboot might be necessary)
The Nagios server should working and accessible from the web interface.


On a separate machine install Centos 6 with minimal packages. Configure the system as needed.

Client nrpe install

  • Install epel
Get the epel release rpm installed it can be found here.
rpm -ivh http://dl.fedoraproject.org/pub/epel/6/x86_64/epel-release-6-7.noarch.rpm

  • Disable selinux
Edit /etc/sysconfig/selinux. Change enforcing to disabled. The reboot


  • Install Nagios nrpe packages
Install nagios-plugins-nrpe, nagios-plugins-al,l nagios-nrpe, openssl
yum install nagios-plugins-nrpe nagios-plugins-all nagios-nrpe openssl


  • Add allowed hosts
Edit allowed hosts in /etc/nagios/nrpe.cfg add the IP of the nrpe and the nagios server
allowed_hosts=127.0.0.1,x.x.x.x
Also change the server_address to the nrpe client IP
chown nrpe:nrpe /etc/nagios/nrpe.cfg


  • nrpe services
Add nrpe 5666/tcp to /etc/services
chkconfig nrpe on
service nrpe restart
Allow port 5666 in iptables
Check connections from both nrpe and nagios server
/usr/lib64/nagios/plugins/check_nrpe -H (IP of nrpe)


  • Add the nrpe client to the nagios server
Create a server config file in /etc/nagios/servers on the nagios server and insert the following

define host{
        use linux-server
        host_name (nrpe client name)
        alias CentOS 6
        address (nrpe client)
}


service nagios restart
There should now be two hosts on in the web interface.

Thursday, May 31, 2012

The beginning of an ISCSI server with LVM and CentOS

Creating an iscsi storage server. The hardware I'm using is an old server with 8 250GB drives. The plan is to install CentOS even though something like FreeNAS would work fine. Setup the disks in a LVM layout with the majority of the free space is used for data storage. Ideally the OS would be on a raided disk array separate from the data storage. But just to get a simple setup going I'll have the OS on a single disk.

General steps:

  1. create and setup logical volume
  2. install iscsi target
  3. configure iscsi
  4. test

  • LVM 
To create a physical volume for use in a logical volume we'll use pvcreate.
pvcreate --zero y /dev/sde will zero the first 2048 bytes of sde and initialize sde for use.
I created 4 PVs using pvcreate --zero y /dev/sde /dev/sdf /dev/sdg /dev/sdh.
Next is to create a volume group.

To create a volume group use vgcreate. vgcreate VG_stor /dev/sde, this will create a volume group with the name VG_stor which contains the PV sde.
For my VG I ran vgcreate VG_stor /dev/sde /dev/sdf /dev/sdg /dev/sdh
Now time to create logical volumes

Logical volumes are created using lvcreate. To create a 100GB volume the command would look like lvcreate -L 100G -n vol_scsi VG_stor. This creates a 100GB volume with the name vol_scsi from the volume group VG_stor.
The command I used was lvcreate -L 100G -n vol_scsi VG_stor

In short
pvcreate --zero y /dev/sde /dev/sdf /dev/sdg /dev/sdh;
vgcreate VG_stor /dev/sde /dev/sdf /dev/sdg /dev/sdh;
lvcreate -L 100G -n vol_scsi VG_stor;


  • iSCSI target setup
Now that the the LV has been created the iSCSI needs to be configured.
To config file for the iSCSI target is /etc/tgt/targets.conf.
This setup will be very simple. Edit targets.conf and add the following:
<target iqn.2012-05.host.server:target0>
     backing-store /dev/VG_stor/vol_scsi
</target>

Now start the target daemon and have it startup on boot.
service tgtd start;
chkconfig tgtd on;

Check the target information
tgtadm --mode target --op show;

Allow port 3260 via tcp in iptables.

This should show the targets that are configured.

All that is left is to create and setup the iSCSI initiator.


  • iSCSI initiator setup


install iscsi-initiator-utils and configure /etc/iscsi/iscsid.conf if needed.
Now time to discover the target. iscsiadm -m discovery -t sendtargets -p iscsi-target-ip
There should be a target listed with the iqn of the iscsi target.

start the iscsi services
service iscsi start;
service iscsid start;

Look at the discovered targets.
iscsiadm -m node -o show;

Time to login to the target and confirm session.
iscsiadm -m node --login;
iscsiadm -m session -o show;

There should be a new entry in /proc/partitions. In my case it was sdd.

Now that is a basic run through on using LVM and iSCSI. It can get much more complex.